Automate: PDF Presentations
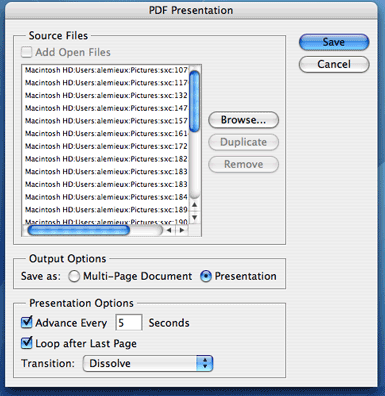
You can create beautiful, full-screen PDF presentations complete with transitions right inside Photoshop or the Bridge. In Photoshop, go to the File menu > Automate > PDF Presentation.

You can use any of the files that you have open already by checking the Add Open Files checkbox or you can browse to find the images or content you want to display. Then, set the Output Options to Presentation. Under Presentation Options you can set the slide to advance however many seconds between each image, to loop after the last page, and choose a transition. The Dissolve transition works very well, but for kicks, choose Random to get a sense of the types of transitions you have to choose from.
Once you click the Save button, Photoshop will ask you to save your PDF. Then the Save Adobe PDF dialog will appear, giving you the standard PDF output options. Click Save PDF and go cook some popcorn. Depending on how many images you chose, it may take a while for Photoshop to build the PDF.
When Photoshop is done and you've woofed down that whole bowl of popcorn, with your greasy fingers, open up the resulting PDF document from the location you saved it in. Each image will appear full-screen on a black background and transition nicely from one to the other. You can use the arrow keys on your keyboard to navigate between slides. Hit the ESC key to get out of the presentation mode.
Speaking of PDFs, be sure to check out the latest version of Proxy from Adobe. Years ago, Adobe published a magazine called Adobe Magazine. I was really bummed when it got scrubbed, but this new Proxy is a mag worth reading. There's great information about downloads from the exchange, good feature columns, and a tutorial section called 'schoolin. Some of the issues even have embedded movie tutorials and Adobe is really just pushing the envelope on what can be done with an interactive PDF.


0 Comments:
Post a Comment
<< Home