Photoshop Obscure Features: Copy Texture To Other Tools
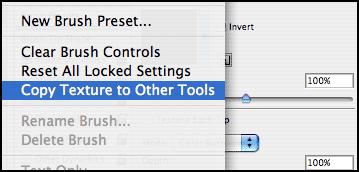
This is the first edition of Photoshop Obscure Features, lesser known features of Photoshop that you've probably seen, most likely, never used, and always wondered about. Today's feature can be found in the Brushes palette's flyout menu: Copy Texture To Other Tools.

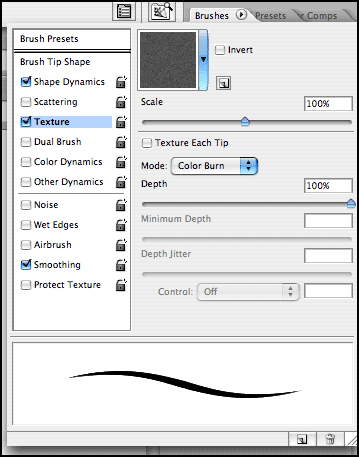
The first thing you'll need is a texture. A texture can be added to your brush by turning on the Texture checkbox on the Brushes palette, then click on the word Texture to see the options and parameters appear in the Brushes palette.

You can choose from a list of preset texture (which are also patterns, go figure) by clicking on the options arrow in the top-right corner of the Brushes palette. There are artistic surfaces, color paper, rock patterns, and others. Of course, if you need your own texture (pattern), you can select a portion of an image and go to the Edit Menu > Define Pattern. Give your pattern a name and click OK. Your pattern will be the last one in the list.
There are several parameters to the Texture, the first of which is scale. At 100%, the pattern fits within the current brush tip width. Increase the scale and you'll see a split in the brush stroke. Decrease the scale and you'll see a bunch of texture squares within your brush. You can turn on the Texture Each Tip checkbox that will apply the texture evenly to each tip within the stroke.
You can also set the mode of the texture, which offers some of the blending modes available elsewhere in Photoshop, like Multiply, Overlay, and others. The last 3 parameters all have to do with the depth of the texture, the last setting of which, the Depth Jitter, can be controlled by Stylus pressure or tilt.
Once you have the Texture set up, you can then choose Copy Texture To Other Tools from the top of the Brushes palette. This makes the same texture and its settings available to other painting and editing tools such as the Pencil, Eraser, Clone Stamp, Pattern Stamp, History Brush, Art History Brush, Dodge, Burn, and Sponge tools. The texture isn't immediately turned on though, so when you do switch to another tool, you'll have to go back to the Brushes palette and turn on the Texture checkbox to use it.
So, when would you use this little feature? A good example is when you're trying to match the grain in an image and you are using different tools to retouch an area that has the same grain in it. Rather than having to select the same texture and settings for each tool, you can set up the texture once, and then Copy it to the other tools.
That's all for this edition of Photoshop Obscure Features. If you have a feature that you're interested in knowing more about, send your comments to this article.

The first thing you'll need is a texture. A texture can be added to your brush by turning on the Texture checkbox on the Brushes palette, then click on the word Texture to see the options and parameters appear in the Brushes palette.

You can choose from a list of preset texture (which are also patterns, go figure) by clicking on the options arrow in the top-right corner of the Brushes palette. There are artistic surfaces, color paper, rock patterns, and others. Of course, if you need your own texture (pattern), you can select a portion of an image and go to the Edit Menu > Define Pattern. Give your pattern a name and click OK. Your pattern will be the last one in the list.
There are several parameters to the Texture, the first of which is scale. At 100%, the pattern fits within the current brush tip width. Increase the scale and you'll see a split in the brush stroke. Decrease the scale and you'll see a bunch of texture squares within your brush. You can turn on the Texture Each Tip checkbox that will apply the texture evenly to each tip within the stroke.
You can also set the mode of the texture, which offers some of the blending modes available elsewhere in Photoshop, like Multiply, Overlay, and others. The last 3 parameters all have to do with the depth of the texture, the last setting of which, the Depth Jitter, can be controlled by Stylus pressure or tilt.
Once you have the Texture set up, you can then choose Copy Texture To Other Tools from the top of the Brushes palette. This makes the same texture and its settings available to other painting and editing tools such as the Pencil, Eraser, Clone Stamp, Pattern Stamp, History Brush, Art History Brush, Dodge, Burn, and Sponge tools. The texture isn't immediately turned on though, so when you do switch to another tool, you'll have to go back to the Brushes palette and turn on the Texture checkbox to use it.
So, when would you use this little feature? A good example is when you're trying to match the grain in an image and you are using different tools to retouch an area that has the same grain in it. Rather than having to select the same texture and settings for each tool, you can set up the texture once, and then Copy it to the other tools.
That's all for this edition of Photoshop Obscure Features. If you have a feature that you're interested in knowing more about, send your comments to this article.


1 Comments:
"The texture isn't immediately turned on though" .... argh!!!!! How do you turn it on? Got all the way through and don't know how to!
Post a Comment
<< Home